Introduction
- For a complete picture of how to use Loop Grids, check out our series of Loop Grid articles:
- What is the loop grid? (with video)
- How do I build a loop grid?
- How do I customize the layout of a loop?
- How do I paginate my loop?
- How do I customize which items appear in my loop?
- Building a query with the loop builder
By default, loops are used to display a list of posts on your site in chronological order (with the most recent post appearing first. However, the Loop Grid offers you enormous flexibility in what items are displayed in a loop. This will help you build a loop perfectly suited for your site.
Example 1 – Alex wants a page that will display the site’s ten latest posts in the Travel category.
Example 2 – Francis wants a page that will display the products in their online store.
Example 3 – Riley wants a page that will display everything related to football – this includes a mix of posts and pages.
Customizing the items appearing in your loop
- Select the Loop Grid
- Go to the Content tab
- Open the Query menu. Here you can customize which items will be displayed.
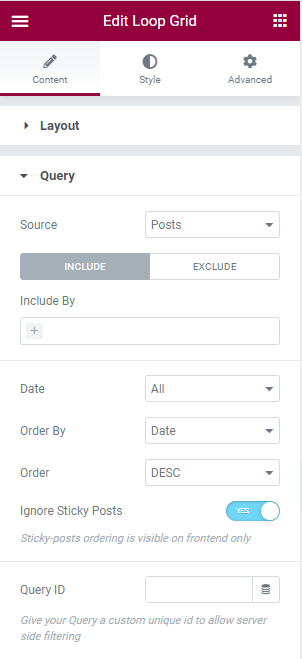
Filtering your list
First, you’ll need to determine the Source of your loop.
- Source: Source defines what type of items will be displayed in the loop. By default, the loop will display Posts, however you may want a loop to display a list of pages, or a manually selected list of posts and pages. can set a different source for your loop. This includes:
- Pages – By creating a loop with pages, you can create a customizable index of your site.
- Landing Pages – Allows you to create a quick way for visitors to access any landing pages you are promoting.
- Manual Selection – Although it’s more time consuming, sometimes you’ll want to create a completely customized selection of items. Manual Selection allows you to select the specific posts and pages that you want to appear in your loop.
- Using the Search & Select box, type in the title of the item you’re looking for and then select if from the dropdown menu.
- Current Query – To save time, Loop Builder allows you to define a group of items that will appear in a list and save it as a Query. You can then reuse the saved query by selecting Current Query.
- Related – Quite often you’ll want to create lists of related items (e.g. all posts in the Sports category). Related allows you to automatically generate a list of items using a property they have in common (such as author, category, tag etc.)
- If nothing fits the conditions you selected, use Fallback to display a selection of items.
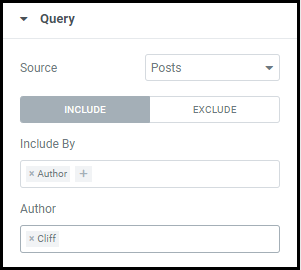
You can further filter your list by including and excluding posts/pages by:
- Author – is used to create lists of all posts by a particular author.
- Category – You must categorize posts when creating them. This can make it easier for visitors to find information that interests them. These categories can also be used to include/exclude them from a loop.
- Tag – Tags are similar to categories but they are optional. You can tag posts when creating them and use these tags to include/exclude them from a loop.
- Current post – include/exclude your most recent post. This is dynamic data so it will automatically determine which is the most recent post and include/exclude it.
- Manual Selection – If the items you want to include/exclude do not have a common property, you can select individually. This is a more time consuming process.
- Date – If you want to limit the items to a certain date range (e.g. all Travel posts from December 2020, you can use this field.
- You can either use a preset date range such as Past Week or set a custom date range.
Ordering your list
By default, loops will display items in chronological order, starting with the most recent item. You can customize the display order, electing to order items by:
- Date – If you want to emphasize your most recent, or older, posts, you can sort them chronologically. Ordering can be in ascending (ASC) or descending (DESC) order – descending order will show the most recent items first.
- Title – In some cases, it will be easier for visitors to find items if they are in alphabetical order. Title orders items in alphabetical order, by title, in ascending (ASC) or descending (DESC) order.
- Menu Order – If your loop has pages in it and you would like them to appear in a particular order, you can assign pages an order. This is done using the Page Attributes in the WordPress dashboard.
- Random – Ordering your pages randomly may be a way to liven up your websites so that visitors don’t always see the same items at the top of your listings.
Query ID
After customizing which posts you want to appear and what order they appear in, use Query ID to save these parameters and reuse them later.
Next Steps
Now that you’ve learned how to customize the items in you loop, you can see it in action with our example of how to build a simple query.
To get the most out of Elementor, check out the Elementor Academy for helpful learning resources. If you come across any issues or need help, please contact our Support Center.