We started Ongage in 2011 with the following vision:
To make it simpler, quicker, and cheaper for marketers to inbox great emails.
Since then, we have been striving to provide our customers with a flexible email solution. Ongage is a component-based, feature-rich email platform. So, it shouldn’t come as a surprise that we want our website to convey the essence of our brand.
Our search for a perfect webpage builder culminated in Elementor. We did a full refactoring of the website using Elementor, and it worked out great.
Without a doubt, working with Elementor saved us in both time and effort. It is possible now for our designer to quickly create versions that our development team can tweak without redundancies or delays. This enables us to have better momentum and faster deployment cycles, which results in more assets being published and tested. Everyone is literally on the same page as a result.

Yes, we created a stunning website, but we didn’t want to stop at it. We wanted to optimize our website to create a great experience for our customers and improve our search engine rankings.
We looked for ways to improve our web experience. We found that the speed and performance of our website could be much better. And we embarked on an arduous journey to make our website faster.
In this article, we will take you through every step in our journey to a faster website. We will also show you how Elementor helped us reach our goal.
Table of Contents
- What Do We Do at Ongage?
- Here’s Why We Chose Elementor To Build Our Website
- Challenge: Speed Up Ongage Website To Match Industry Standards
- Step 1: Changing Major Website Elements
- Step 2: Conducting Deeper Investigations and Making Fixes
- Step 3: Deploying Changes Without Breaking Our Production Website
- The Final Outcome
- Achieving Perfection Is a Continuous Process
- Final Thoughts
What Do We Do at Ongage?
Ongage was founded by a group of entrepreneurial professionals aiming to revolutionize email marketing, the #1 marketing channel in terms of return on investment (ROI).
Ongage is a full-stack email marketing platform that focuses on fueling growth and reducing noise in large-scale email and customer relationship management (CRM) operations.
With the following key features, Ongage provides better email marketing:
- Dynamic campaigns
- Segmentation
- Personalization capabilities
We have created a component-based platform powered by a feature-rich dashboard that hosts advanced segmentation tools and a full analytics suite. Our vision is to help marketers create a consolidated and effective email marketing operation. We also help them customize our platform to suit their needs.
Here’s Why We Chose Elementor To Build Our Website
We wanted to make a pixel-perfect website that perfectly conveyed the Ongage brand. We were looking for a fast website builder which offered us the following features:
- The website builder should allow complex pages and layouts.
- It should help us design pages quickly but be flexible enough to permit a custom design.
- The website builder shouldn’t have integration issues with our existing plugins.
- It should always be up-to-date and provide good support.
We tried several website builders but found there was often a tradeoff between ease of use and flexibility of styling. Our search ended at Elementor. Elementor widgets and responsive design features helped us save time developing layouts and let us focus on the styling.
Our Senior Web Developer, Irinel Mita, shares: “Elementor is perfect for us to create our page layouts faster and to focus on functionality. The views for responsive design and breakpoints help us ensure our website looks good on all devices.
Elementor offers a great level of flexibility and control over every part we are developing, allowing us to achieve a pixel-perfect implementation.

Elementor also has good support and follows industry standards in terms of security and updates. It is easy to use and integrate with other plugins.
Elementor made for a good choice in website builders. Using Elementor Pro, we did a complete refactoring of the website. As a page builder, Elementor helped us redesign the website faster and proved to be a significant time-saver when creating our regularly published blog posts.
But we stumbled upon a problem.
Challenge: Speed Up Ongage Website To Match Industry Standards
Google and Lighthouse have pretty high standards for website speed and performance. Those standards have become the benchmarks for website speed in the industry.
We had left this task of speeding up our website as a backlog task with lower priority. But once our website was in good shape, we had to fix our performance issues.
We started at the bottom. We started with a low-speed score on Google PageSpeed Insights. Our mobile website scored 17, and desktop website 40.
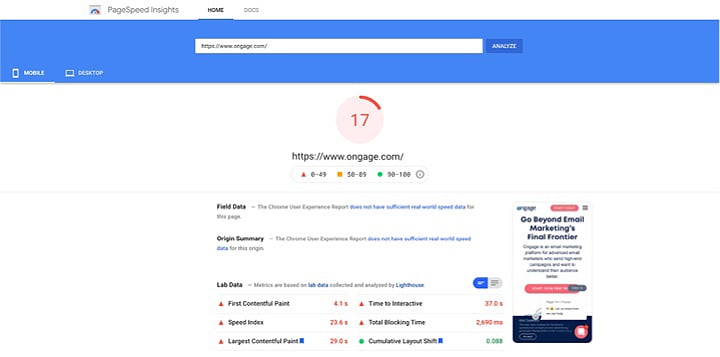
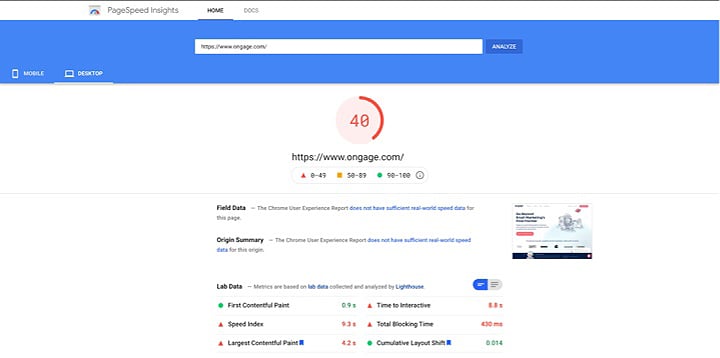
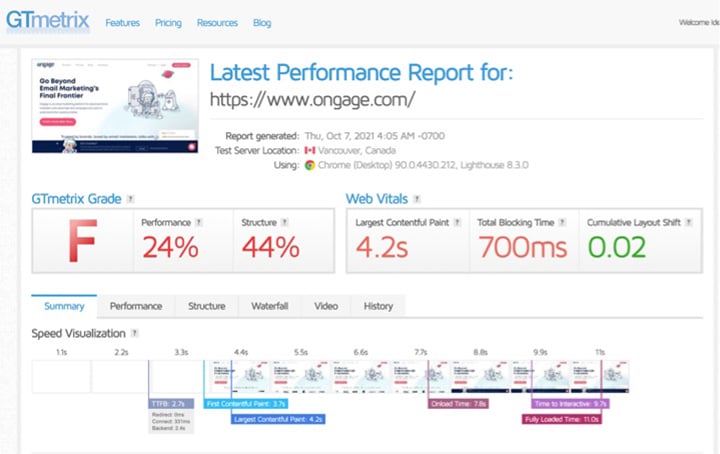
That doesn’t look very good, right?
We fixed it. It took time and effort, but we managed to resolve these issues.
Here’s where we stand in terms of website performance now. We have increased the mobile score to 64 and the desktop speed score to 84.
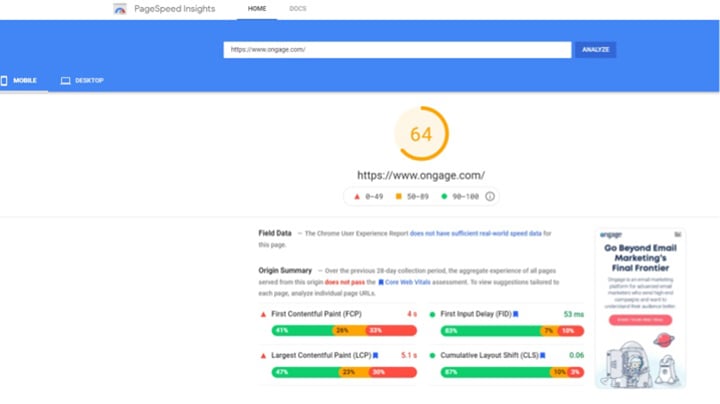
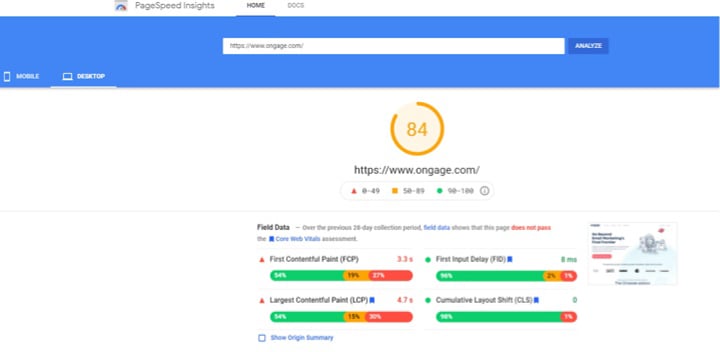
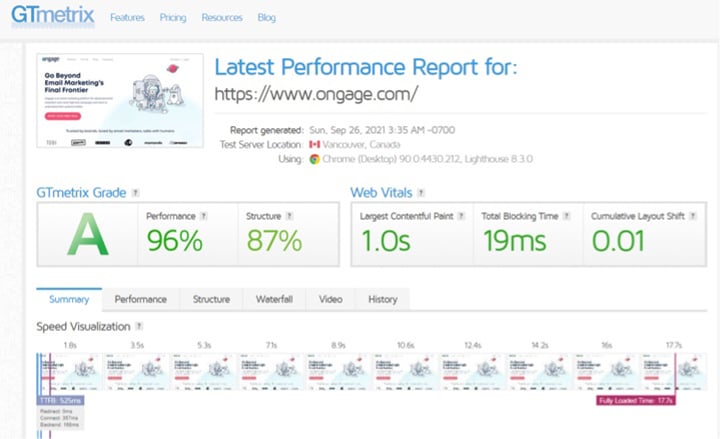
Yes, That’s a 276% increase in mobile and a 110% increase in desktop website speeds.
It was a difficult task. We approached the issue systematically, scrutinizing many components of our website, such as:
- Website template
- Hosting
- Caching
- JS Delay
- CDN
- Chatbots
- Fonts
Yes, we know it’s a lot to process. So, let us explain our speed enhancement journey step-by-step.
Step 1: Changing Major Website Elements
It was logical to start with the major website elements like the template, hosting, caching, and chatbot. So, we evaluated each of these elements and made adjustments that immediately enhanced our website speed.
Switching to Elementor’s Hello Template
We had been using a paid PRO template, and it proved to be too heavy. After redesigning the Ongage website, we weren’t even using most of this template’s features. While this template was light among many other choices, we needed to change it to optimize our performance.
We decided on the Hello Elementor theme. This made sense since we were already building with Elementor, and we wanted a very lightweight theme. After a few days of testing and fixing the bugs, we were ready to make the changes live.
The results looked a lot better on the desktop. Just changing to Elementor’s Hello theme improved our website’s speed by 37.5%.
ALT: Improvement in Ongage’s website speed after implementing the Hello Elementor theme.
Using WP Rocket WordPress Plugin
A significant change we made in our WordPress website was using the WP Rocket plugin. WP Rocket proved to be a great help in improving our website speed.
Here are the main changes we made using the WP Rocket plugin.
Caching
We changed our caching plugin to WP Rocket and used the following features.
- Caching for all pages
- Browser caching
- Separate cache for mobile
- Cache preloading
They brought significant improvements for load times for both desktop and mobile.
We were a bit concerned about the compatibility issue with our template. But we found almost no compatibility issues with the Hello Elementor theme and Elementor features we used.

According to Kobi Mori, a Senior Graphic Designer at Ongage, Elementor has been easy to use and flexible with changes:
“My work as a designer with the Elementor platform started when I understood how much time I’m waiting during the day on delivering my work to developers. Sometimes I found myself writing half a word paper just to explain the behavior of a CTA button.
I felt like teaching someone to swim via Zoom! The efficiency that Elementor brought to my work is exceptional, a game-changer even.”
Lighter Files
We used the minification from WP Rocket for CSS and JS files. This process removed the white space and comments from the code and made the files smaller and faster to download.
Note: For JavaScript, WP Rocket has an excellent article for finding the right js files to exclude from minification to repair any broken page or script.
JavaScript Delay
We also used the delay JavaScript execution feature of WP Rocket. This feature delays the loading of JavaScript files and inline scripts until there is user interaction.
Due to the new changes in WP Rocket version 3.9, the developer might need to tweak in the JavaScript exclusion file.
We had a few issues, but we resolved them thanks to the list of compatibility solutions offered by WP Rocket.
Content Delivery Network
We used Amazon Cloudfront CDN and set it up with WP Rocket. It greatly improved our loading times.
Changing Our Chatbot’s Behaviour
We use intercom, which is a great way to support website visitors or get new leads. However, we found that it affects loading speed.
So we decided to load the chatbot only after scroll since it does not impact functionally. It awarded us a few points with Google PageSpeed (a gain of 10 points average on desktop and 5 on mobile).
Evaluating Our Hosting Server
Our time to first byte (TTFB) was lackluster, so we tried switching to a stronger one. Earlier, we were using Amazon’s t3.large server. We did a significant upgrade to a more memory-intensive r5.2xlarge at an additional cost of $10/per day.
It improved our initial server response (from 2.0s to 1.3s), but it was costly. It increased our Google PageSpeed score by a small amount, so the cost-to-benefit ratio was low.
We decided to keep this as a solution we can use if the other improvement steps come out to be insufficient.
Step 2: Conducting Deeper Investigations and Making Fixes
Once we made significant changes to our website, it was time to dive deep into our website. We conducted deeper investigations and fixed multiple minor issues that affected our website’s speed.
We made the following changes:
- With custom code, we prevented multiple fonts from preloading into the browser.
- We already had image optimizations using Simple Image Sizes. With the WebP Express plugin, we converted images to a new generation format.
- We performed a page-by-page CSS extraction.
The CSS Extraction Procedure
If you are interested to know more about the CSS extraction process, here are the step-by-step instructions.
We performed this procedure page by page. We started with pages that had fewer visits and for which we expect low traffic.
1. Using Google Chrome and developer tools, go to More tools˃ Coverage˃
2. Click on the refresh icon to refresh the page and start recording.
3. Scroll up and down the page to fully load all page elements.
4. With the developer tools, open switch between mobile and tablet devices to extra-large devices that match the website’s targeted viewports. Repeat step 2.
5. Once completed, click stop recording (refresh button turned red)
6. Click on a CSS resource, which will pop up a view of all used CSS and unused styles (in red) for a given file from the recorded session.
7. Create a new file with the “CSS” extension, copy all used styles, and paste them into it.
8. Upload the file and source it in the <style id=”page-css”>*</style>
Step 3: Deploying Changes Without Breaking Our Production Website
We had made several changes to our website, and we knew it was risky. Hence, we had maintained three different environments — development, staging, and production.
We used Docker containers to have two development environments and one staging environment on the same server at a low cost. While it added a few more steps in development, it ensured we had control over the changes.
We now follow the below procedure to make changes in the production environment:
- We use a deployment script that creates an archive of all the files, images, and DB.
- The script tags this archive uniquely from the source environment.
- The script then replaces all the WP files and the DB on the target environment.
- To make sure all the links are updated, we use a migration plugin.
We used Elementor’s WordPress Command Line (WP CLI) integration to Flush the Elementor Website Builder CSS Cache.
The Final Outcome
With our efforts with Elementor and WP Rocket plugin, we achieved a whopping 110% increase in our website speed. Not just that, we achieved an improvement in our organic traffic numbers. We reduced the bounce rate from 61.19% to a mere 2.80%.
These were our organic search traffic numbers before using Elementor and implementing the speed changes:
| Bounce Rate | Pages / Session | Avg. Session Duraion |
| 61.91% | 1.33 | 00:01:37 |
Here are our organic search traffic numbers after using Elementor and implementing speed changes:
| Bounce Rate | Pages / Session | Avg. Session Duration |
| 2.80% | 1.43 | 00:03:05 |
Achieving Perfection Is a Continuous Process
We know that perfection is hard to achieve and optimization never finishes. But we are happy that the bulk of the work has been completed. And we must now keep an eye on the performance aspect with every new change. So we have decided to scrutinize every plugin, script, and design change through the lighthouse tool.
Checking for speed issues has become a mandatory step before sending new features or changes to QA. We make sure that any new work is laid down on a good foundation, so it doesn’t impact the performance of our website.
After all, we worked very hard to reach the current website speed and performance.
Final Thoughts
Choosing Elementor for our website development was a decision between the marketing and development teams. Ongage needed a website builder that’s flexible and secure. While we were keen on faster development options, we didn’t want to let go of the possibility of following the design perfectly.
Elementor proved to be a great ally, both in building and speeding up the Ongage website. We have reached a new benchmark in our website speed.
Tweet us at @Ongage if you find our journey inspiring.