WordPress user roles are the solution to a common problem web designers and developers have: You finally finish your client’s site, wrap up and send over the files and login details. A few days or weeks later, you get a call that the site isn’t working right. When you log in, you see that the client has accidentally broken the whole thing!
No client is trying to mess things up intentionally. But when they have access to tools they don’t know how to work with, problems can arise quickly. After all, with great power comes great responsibility. It’s easy to make a huge mistake, even when you’re just trying to change some text or move things around a bit.
WordPress user roles were created to help solve this problem. With these, you can assign people roles depending on what you want to give them access to. However, WordPress roles work best for editors and writers expanding their team – they’re not optimized for web designers’ needs.
That’s where the Elementor Role Manager comes in. Made just for designers, this tool offers extra functionality for them. You can keep certain users out of the Elementor editor entirely, or give them access to content only. That way, you can reduce accidents and protect your design.
Ready to learn more about user roles and how you can turn on Elementor’s user features? We’ll help you gain more control over your designs post-hand-off, and keep clients and their editors from messing them up.
What Are User Roles?
WordPress roles were made to correct a common problem people have when they need to bring on more authors and editors: How can you keep them from messing with settings they’re not supposed to or don’t need to?
Thanks to user roles, it’s easy to add people to your site and not have to worry about them getting into parts of the site they don’t belong in. They are made to restrict people from features they don’t need to have access to.
They Keep Your Site Safe
Each role in WordPress comes with a specific set of permissions. For instance, the Contributor can delete and edit their own non-published posts as well as read other posts – that’s it. From there, the roles gain more permissions each level you step up.
When you work with strangers, such as authors who write guest posts on your site, it’s just not a good idea to give them more power than they need.
Malicious users can gain access to your site under the guise of becoming a guest poster. Once they do, they can deface everything, delete pages or even take down the whole website. You could also get on bad terms with one of your editors, only to have them turn around and go on a deletion spree.
But they can only do that if you give them elevated permissions. That’s why you should use user roles for untrusted new members. You can always bump them up when they need extra functionality, and they’ve proven that they can be trusted.
They Prevent Accidents
But why would you need to assign roles like this, especially when you’re working with someone you trust – like a client?
Even with trusted contributors (and your design clients), it’s still better to avoid giving them access to more functionality than they need to do their job. It can confuse, and there’s no reason they should have access to features they won’t use.
At the same time, restricting what they can do dramatically reduces the chance of accidents happening. Frequently, people mess up by accident and not out of malicious intent. The right user roles minimize the chances of that.
Now let’s go over the WordPress user roles and learn how to apply them. As Elementor Role Manager integrates with the default roles, you’ll need to understand how to work with both.
WordPress User Roles
WordPress created user roles so that you could take control of your site and restrict access to it for other people. By using them, you can ensure that the new person you invite onto your site doesn’t, accidentally or maliciously, mess up any settings or delete anything sensitive.

You can change how each role works and what they have access to individually with plugins. However, WordPress also comes with six default roles out of the box.
Default User Roles in WordPress
Besides the information below, you can also find out more about WordPress user roles in the WordPress Codex.
- Super Admin – Super admins have ultimate control over an entire network of sites if you’re using multisite. This is a role that should probably be reserved for yourself and trusted co-owners.
- Administrator – Not to be given away lightly, the admin role enables control over your entire site. Admins can delete posts and pages, activate plugins, and do other vital tasks. If you’re not using multisite, admins can also install plugins or even delete everything.
- Editor – Editor is a trusted role. It gives people the ability to upload and manage all posts and pages on a site.
- Author – Authors can create and delete only their own posts. They can’t make or modify pages at all.
- Contributor – Contributors can create posts, but it’s up to higher roles to publish or delete them.
- Subscriber – Subscribers can only manage their own profile. They cannot edit or contribute to the site.
As you can see, this mostly affects permissions surrounding blog posts. When it comes to restricting other features of the site, especially in design areas, functionality is limited. Authors can only edit their own pages; editors can edit the content of all pages on the site (but can’t touch theme options at all). Administrators have control over everything.
Some plugins or themes can add extra roles with different functionality, or modify the current roles. You can also use a plugin to change what features each role has access to yourself.
However, next, we’ll give you a step-by-step tutorial on the default capabilities WordPress provides for editing user roles and applying them.
How to Apply and Edit WordPress User Roles
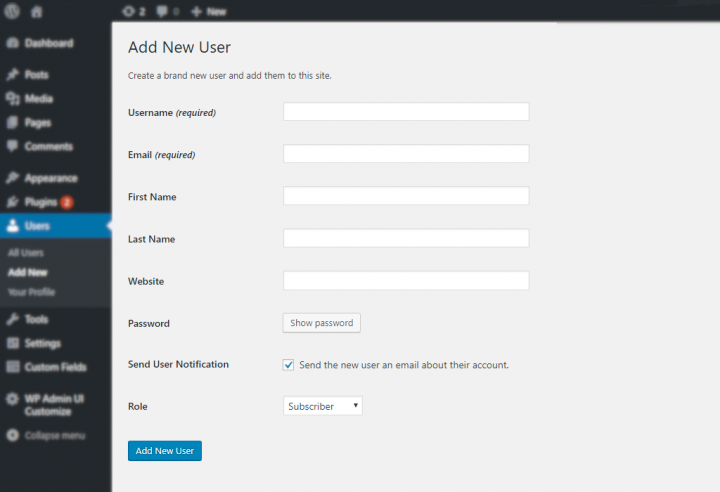
If you want to add users and set their roles, your first address in the WordPress back end is Users > Add New.

Enter the email provided by the person you want to add, then put in their username and any other info you have. Their password will be auto-generated, or you can create your own. You can either give it to them yourself or click the Send the new user an email box to mail it to them.
Next, select the role you want to give them from the drop-down and click Add New User to finish up. Make sure to give Editor and Administrator roles only to trusted people.
You can also change the roles of existing users. Go to Users > All Users and click on the role you want to modify.
You’ll see a section called Role and a drop-down. Click it and select the new role you want them to have, then click the Update User button.
Unfortunately, there’s no way to edit what these roles have access to except by using a plugin like Capability Manager Enhanced or User Role Editor. However, they usually only allow you to edit user permissions for default WordPress functions. Users may still be able to access certain plugin functionalities, like the Elementor editor.
Some designers will give their clients the Editor role. That way, they can only create blog posts and new pages, but won’t be able to edit the theme and potentially mess up the design.
This can work, but what if the client understandably wants to have the administrator role? Or what if something comes up that they can’t fix because they don’t have the proper permissions? Default user roles aren’t always the right solution.
That’s where the Elementor Role Manager comes in.
Elementor Role Manager
Our Role Manager was made to address that common problem: Designers need a way to restrict clients from editing sensitive parts of a website’s design, and clients often need to be able to edit a site’s content.
The premise is simple. Our Role Manager works seamlessly with the default WordPress user roles, as well as with any roles added by themes and plugins. This is much more fluid than adding an extra Elementor Editor role – just restrict or grant access to the editor on any role you want.
If you used a plugin to edit what each role does, you can continue to use those modified roles. Just grant or revoke access to Elementor as needed.
You shouldn’t rely on WordPress’ default functionality and hope that your clients won’t break something down the road. Even the most well-meaning person can make a mistake, especially if they haven’t used a tool like Elementor before. It’s easy to add or move elements accidentally and have no idea how to put them back.
So we finally gave designers who are struggling to restrict access to clients a way to do so. This feature is available whether you use the free or Pro version of Elementor.
How to Manage Roles in Elementor
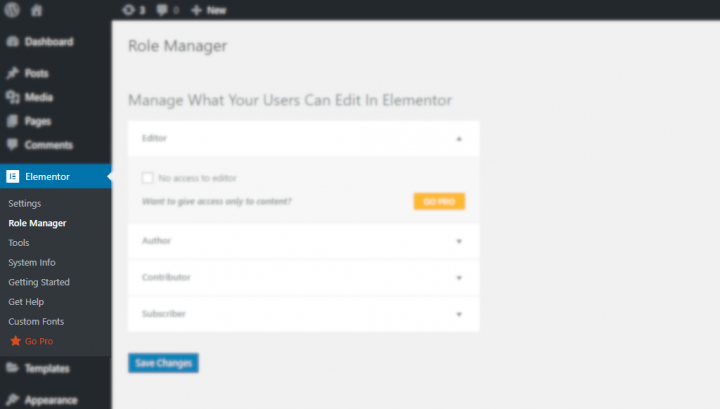
With Elementor installed, go to your WordPress backend and click Elementor > Role Manager.

Each role on your site will have a drop-down menu. Click it, and you’ll see one or two checkboxes:
- No access to editor
- Access to edit content only
Tick the first box, and this role won’t even see an Edit with Elementor button. They’ll have absolutely no access to Elementor or any of the content on a page designed with it.
Of course, this isn’t viable for many clients. If you have Elementor Pro, you’ll see that second option: Access to edit content only.
This will allow that role to open the editor and access content on that page, such as text and images. However, they won’t be able to move columns around, add widgets or any other features that could modify the look of your site.
This will minimize a lot of problems that could crop up. At the same time, it will allow clients to change text and images without having to constantly ask for your help.
Which Option Should You Use?
It’s recommended that you set No access to editor for any roles below Editor, so contributors and authors the client brings on won’t be able to edit site content. These permissions are something you can discuss with them.
If you leave both these checkboxes off for any role, they’ll have full access to Elementor, so be sure to tick at least one of the settings for roles you want to restrict.
Make sure to double-check the permissions you’ve set for each role, and click Save Changes.
Your client is of course likely going to want to have access to the Administrator role. Just give the Editor role access to site content and make a user account for the client to log in to make changes safely.
Capability Manager Enhanced or a similar plugin will also allow you to create a second Elementor Editor role that has access to content, without having to modify the default Editor role.
User Roles Keep Your Design Safe
For designers using Elementor, the default WordPress user roles aren’t going to cut it. You need a specialized solution that restricts the Elementor editor and lets you rest easy knowing your design will be left intact.
With the Elementor Role Manager, that’s exactly what you’ll get. Keep clients out of the editor entirely, or just give them access to content like text and images. They can still use their site as they need to, without running the risk of accidentally breaking something.
This is the best solution for designers who have struggled to make default user roles work with their tools before.
Before you found Elementor, how did you keep clients from editing your design? Let us know about your experiences in the comments, and if there’s something you’d love to see added to the Role Manager!
Looking for fresh content?
By entering your email, you agree to receive Elementor emails, including marketing emails,
and agree to our Terms & Conditions and Privacy Policy.
