In this tutorial, we explain what parallax effects are, why you should be using them, and how Elementor can make using parallax that much easier.
If you are a web designer, you may have dabbled in some coding here and there. Maybe you’ve tried to create an engaging homepage, or a landing page stands out from the crowd; Maybe it was for an ecommerce site that funneled people creatively to make a purchase.
Wherever you’ve tried to implement coding — for CSS animations or otherwise, you surely know that it’s not always easy, especially if you are a beginner. Parallax effects are no different, and in fact, are even more complicated to code. Creating parallax effects is time-consuming and hard.
This guide will explain what parallax are, why you should be using them, and explore examples so you can start implementing them in your websites straight away without any coding (when building a one-page website, for example).
What Is the Parallax Effect?
The parallax effect is a very popular design feature that is commonly used on WordPress websites. In short, it’s a scrolling effect where the background images move slower than the foreground elements, giving the illusion of three dimensions in a 2D space.
It’s been featured heavily in the gaming industry for years but has recently crossed over into web design as well.
Now, you can create a beautiful page design with eye-catching effects that will make visiting your pages all the more interesting.
Parallax & Gaming. Credit: Cadillacs & Dinosaurs
Why Use Parallax Effects
Improved User Experience
Research has shown that micro-interactions and animated user interfaces are key elements when it comes to making digital interfaces engaging and usable.
Reduced Bounce Rates
Bounce rates are the percentage of site visitors who either hit the ‘back’ button or close the tab before checking out other pages on the site. High bounce rates have a pretty significant impact on your SEO ranking. Engaging parallax effects can bring that rate down.
Increased Engagement
A great thing about parallax scrolling is that it creates such an engaging and immersive environment for a story to unfold in. Parallax allows you to dynamically reveal details of your product as the user goes through the narrative you created for them and, when done right, the parallax effect gives the user the feeling that they’re in control and that they choose to engage with your site.
Elementor Pro enables you to use many different types of Parallax effects with ease and absolutely no coding requirements.
Types of Parallax Effects
Parallax effects are based on one of two elements: Parallax scrolling effects, which are based on scrolling through the page, and mouse effects, which are based on the movement of the user’s mouse.
Scrolling Based Parallax Effects
Parallax Background Scroll
This is one of the oldest tricks in the parallax book and a great place to start. Changing the background while scrolling will allow you to tell the compelling story you wanted to tell. This is especially useful if you have a one-page website.
Parallax & Gaming. Credit: Cadillacs & Dinosaurs
Parallax Vertical Scroll
If you want to give your users the feeling of floating elements that move with them at different speeds while they scroll, try a vertical scroll. Notice that you can use multiple layers in order to do so.
Credit: https://www.allyourdays.com/
Parallax Horizontal Scroll
Let’s say you created a mock-up for a project, but it’s a bit dull and you want to spice it up. Flying a shuttle into the middle of the screen using a horizontal scroll should definitely do the trick.
Parallax Transparency Effect
If you want to get that fade out transition effect while scrolling, you can now do it super easily. Use it to reveal a new topic, just like they used to in wheel of fortune.
Credit: https://www.fatmedia.co.uk/
Parallax Blur Effect
No, not the ‘90s band. We’re talking about that smooth effect where an image or text slowly fades away as you scroll down, or fades back in when you scroll up. Now you can scroll down like a pro, just don’t look back in anger!
Parallax Rotate Effect
Ever wanted to have a DJ astronaut? No? Well, it’s the best use case I’ve seen for the rotate effect so deal with it.
Parallax Scale Effect
This one lets you create that zoom in, zoom out tunnel effect. It might get a bit weird so use it responsibly.
Credit: https://fazemodels.com/
Mouse Based Parallax Effects
It’s not all about the scroll though. Here are some eye-catching effects based on the movement of the user’s mouse.
Parallax Mouse Track
With mouse tracking, you can create elements whose movement is based on the movement of the cursor. You can make the elements follow the movement of the mouse or move opposite from it. And in Elementor, you can easily control the speed of the effect as well.
Credit: http://benandmartin.com/
Parallax 3D Tilt
You can even play around with the angle of the image a bit and make elements tilt from side to side, creating that sweet 3D movement effect.
Credit: https://yasio.pl/
Credit: https://www.jorik.com/
Adding Parallax Effects Manually
This method of adding parallax effects to your WordPress site requires you to have a good grasp of HTML and CSS coding. It is extremely difficult if you don’t know how to code and is not recommended for beginners. It also limits your Parallax effects options.
Here’s how you do it:
- Upload an image you’d like to use for the parallax effect to WordPress.
- Copy the image URL from the WordPress media library.
- Add the following code:
.parallax {
background-image: url(“image URL.jpg”);
Height: (xxx)px;
background-attachment: fixed;
background-position: center;
background-repeat: no-repeat;
background-size: cover;
}
<div class=”parallax”></div>
You’ll have to dive into this deeper if you want to make your parallax effects more appealing, and reactive to the user’s actions. Clearly, this is not the best way to approach adding parallax effects to your website.
Adding Parallax Effects With Plugins
There are many plugins that make adding parallax effect to your WordPress website easy. Essential Addons for Elementor, ScrollMagic, Kreatura Slider Plugin for WordPress, Advanced WordPress Backgrounds, Parallax Image, and more. Most of them do, however, required some minor coding tweaking.
For Parallax Image, for example, all you need to do is install it from the WordPress plugins repository and activate it. Once you do that, you can add shortcodes to the page, which will create parallax effects. Their instructions are easy to follow.
ScrollMagic, for example, requires you to download it and add it to the core library in your HTML file. Then, there’s some code tweaking to do, in an easier form like this:
// init controller
var controller = new ScrollMagic.Controller();
// create a scene
new ScrollMagic.Scene({
duration: 100, // the scene should last for a scroll distance of 100px
offset: 50 // start this scene after scrolling for 50px
})
.setPin(‘#my-sticky-element’) // pins the element for the the scene’s duration
.addTo(controller); // assign the scene to the controller
Adding Parallax Effects With Elementor
To some, the above methods may do the trick, but for most people who want to simply edit their parallax effects with absolute ease, in a visual way, Elementor is the best solution.
There are 2 different ways to use parallax in Elementor. The first is parallax effects for web elements and the second is parallax effects for the background.
Parallax Effect on a Web Element
Step 1: Choose an Element and Add Parallax
In order to add some parallax magic to your Elementor website, the first thing you need to do is pick which element you want to add it to. This could be a picture, text, video, etc.
Let’s get started by clicking on the widget and going to the Advanced Tab.
Step 2: Under Motion Effect, Switch to Scrolling Effect
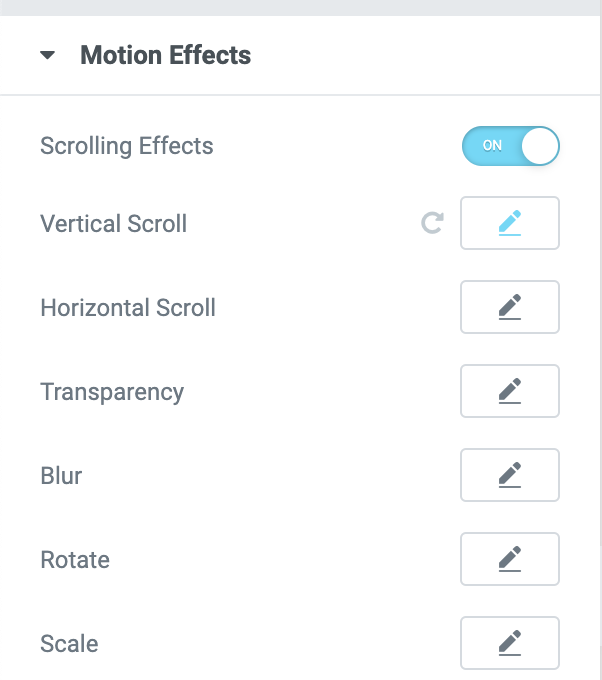
Once you’re on the advanced tab, click the Motion Effect dropdown and then set Scrolling Effects to On. Now you can choose any of the 6 animations that will bring your website to life.
Step 3: Adjust the Animation According to Your Needs
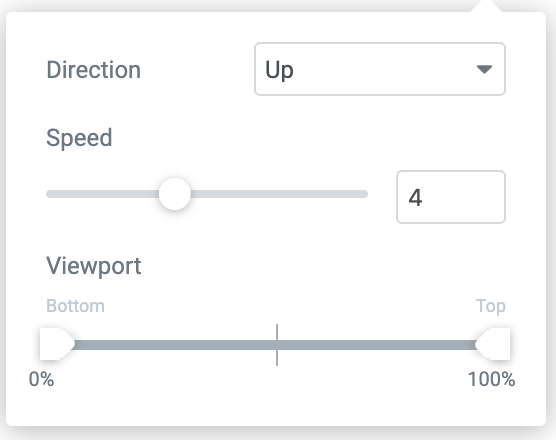
You can change and tweak each effect to get it just right. Simply press the pencil icon and a window will open up with controls.
For each effect, you can adjust the direction, speed, and viewport which controls when the animation starts and when it ends.
In addition, you can define on the Viewport scale on what part of the scroll your effect will start and on what part it will end.
Step 4: Pick More Than One Animation for a Single Element
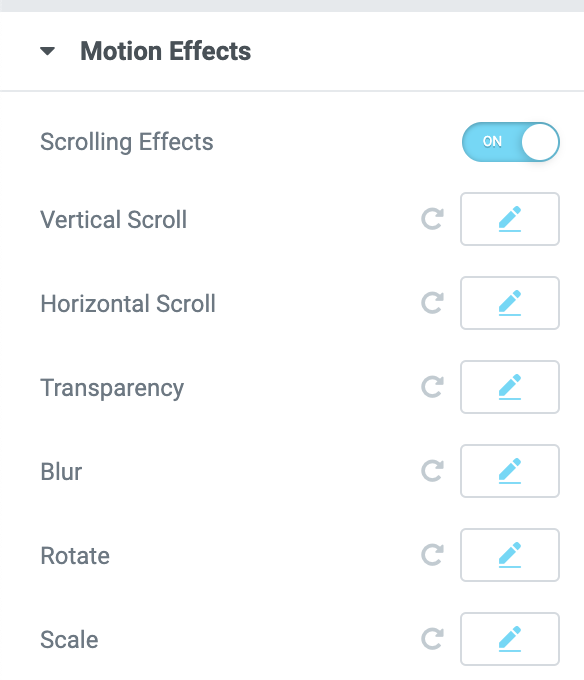
For every element, you can apply as many effects as you like; just DON’T overdo it.
Pressing on the arrow button next to the pencil will undo the animation so feel free to experiment and play around with it until you get it just right.
For the Rotate and Scale position you can adjust the “X” and “Y” anchor points which determine the axis around which the element scales or rotates.

Step 5: Add Mouse Track & 3D Tilt
This one works only on desktop devices obviously but you can make elements move based on your mouse movement. Imagine you want to have an overlay parallax of stars and you want to make them interact with your mouse.
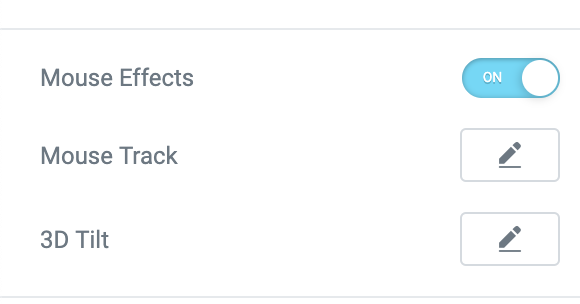
We have two options here: Mouse Track that Creates a sense of depth by making elements move in relation to the visitor’s mouse movement and a 3D Tilt effect that tilts the element according to the same movement of the cursor.
Step 6: Apply Parallax (Only the Motion Effect) on Different Devices
An effect that works well and looks good on desktop, wouldn’t necessarily work well on mobile. Luckily, Elementor 2.5 lets you pick which devices you want to apply the effects to.

Parallax Effect on a Background
Step 1: Go to Your Elementor Website and Click on One of the Website’s Sections
Now let’s add some parallax to the background to give the website a greater sense of depth. To do this, we need to start with the Style tab.
Step 2: Under the Background Section, Switch to Motion Effect or Mouse Effect
Now you can choose between 2 different effects that you can apply to your background layer: the scrolling effect and the mouse effect. Read more about them here.

Step 3: Repeat Steps 3 to 6 From the Previous Session
It’s exactly the same effects and implementation as before, only now it can be applied on the background too!
See how it works here:
Add Parallax Effects To Your Website With The Elementor Page Builder
Adding parallax effects to your website design has never been easier. There’s no need for specialized Parallax WordPress themes, you can simply use Elementor, the best drag-and-drop website builder out there.
Spruce up your online shop, design engaging blog layouts, or create astounding landing pages.
It doesn’t matter if you are a freelancer, a small business, or a whole corporation — anybody can add parallax effects to their website now.
Just follow the steps in this article and start creating your brand new parallax website.
Looking for fresh content?
By entering your email, you agree to receive Elementor emails, including marketing emails,
and agree to our Terms & Conditions and Privacy Policy.
