Using SEO plugins alongside Elementor can be a pain. That’s always been a weak point. Since the Elementor editor brings you to a separate page to design your site, it was impossible to get real-time SEO updates on the content you were writing.
As of now, the days of disjointed workflows are over. Rank Math, a popular SEO plugin, has just released a new integration for Elementor. Now, you can get SEO suggestions, edit your meta snippet, and configure schema markup right within the editing screen! This means, a long-running issue has finally been solved, and you can now have an even smoother, more streamlined workflow inside Elementor.
Let’s go over absolutely everything added to this brand new integration. There’s quite a few features to touch on, and we’ll walk you through them all.
Why the Integration?
The Elementor editor existing on its own page is necessary for a few reasons. There are just too many features and buttons to fit within the scope of the default WordPress editor, and it also provides a clean, distraction-free interface for web designing.
The downside is that it can be somewhat disruptive to other plugins that rely on the normal editing screen to function. Case in point: SEO plugins, whose interfaces are usually built right into the default editor.
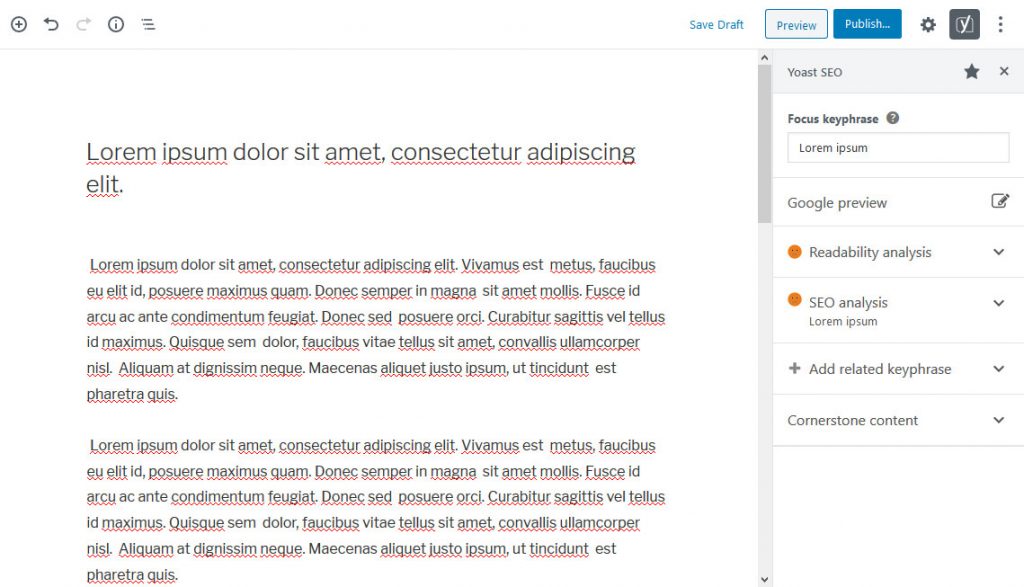
Elementor doesn’t totally disable plugins that work this way, of course; you can just open a new tab and refresh it every time you want the SEO plugin to re-check any new content you’ve written.
But the process is cumbersome. You would need to write your text in Elementor, click to update the page, go back to the normal Gutenberg or Classic editing screen, and refresh. Only then could you see your updated SEO score. That was the best solution in existence, and it isn’t exactly a great one. Most editors want to keep an eye on their content score as they write.
And it only got more annoying when it came time to carefully edit your content to increase its SEO ranking or resolve issues. Without any way to see in real time what effect the changes were having on your score, you’d have to refresh for every tiny edit you made.
What you need is a way to see SEO errors in your content, set a focus keyword, and change other page-level SEO features, all without ever leaving Elementor. And that’s exactly what Rank Math has brought to the table.
All the SEO functions you’ll need for individual pages are right there inside the editing screen. Finally, there’s a streamlined way to write content in Elementor and optimize it for SEO at the same time.
5 Exciting Things You Can Do with Rank Math
Ready to see the powerful features the Rank Math integration provides? There’s a decent array of new settings, and we’ll show you how to use them all. Let’s go through every feature and explain what each of them can do.
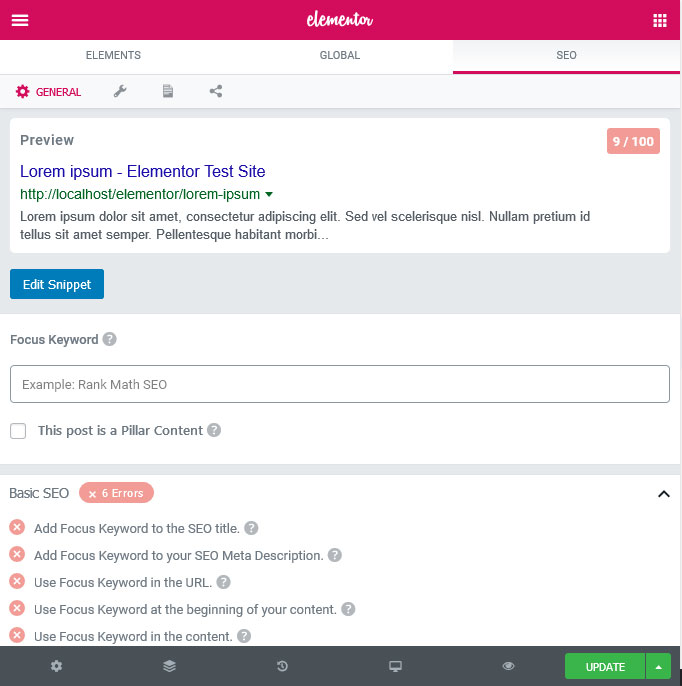
Once you have installed both Elementor and RankMath (more on that below), you can find all of the new SEO settings under a new tab labeled SEO within the Elementor editor.
Edit Meta Snippets and Social Previews
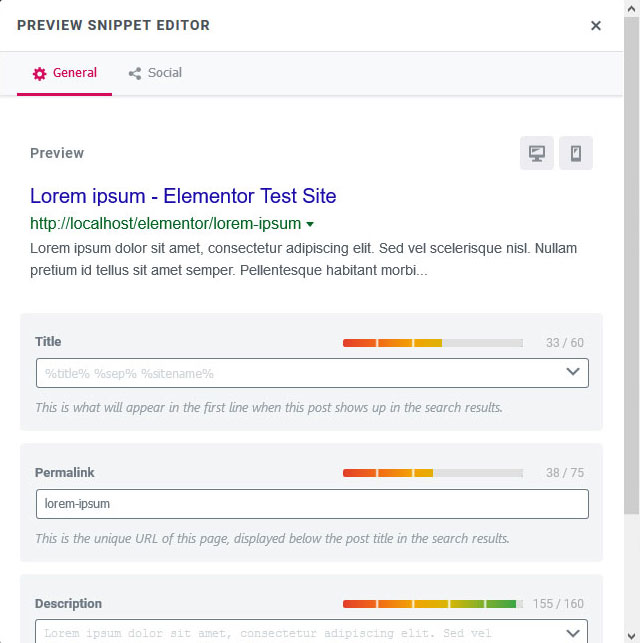
The first thing you’ll likely notice within the Rank Math interface is the snippet editor, located at the very top of the General tab. You can edit it by clicking Edit Snippet or the social icon on the far right.
A lightbox will pop up with a General and Social tab, showing you a preview of how your meta description will look in search engines – on both mobile and desktop. You can change the title, description, and permalink that will display in Google. A suggested character limit is shown, which updates live.
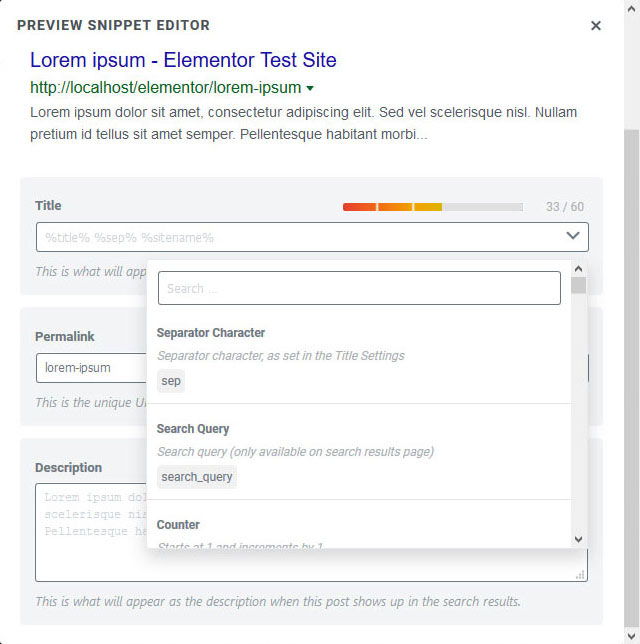
Click the arrow on the right of each input box to access a list of dynamic variables. For instance, the sitename variable displays the current title of your site. If you update the title later, your snippet will update too. There are other cool additions like current day/month/year, date modified, and page number.
Curious how best to fill in this info? We give a brief tutorial in our on-page SEO checklist.
Once you’re finished, head over to the Social tab to customize in-depth how your page will appear when shared on social media. There’s both a Facebook and Twitter editor.

From this screen, you can upload a social preview image – with suggested dimensions to make sure it isn’t stretched or blurry – include a custom title and description, and add a video or gif overlay to encourage people to click through.
The Twitter tab is much the same, with the option to either use the Facebook tab’s settings or write a separate snippet. You can also choose the card type: summary, summary with large image, app card, or player card. The app card is for mobile apps and allows you to link to the download page, while the player card lets you embed videos or streams.
Set a Focus Keyword
Before the Rank Math integration came to life, this was one of the more difficult areas for users to optimize. On the default WordPress editor, you can set a focus keyword right there and get live updates on how well you’re using it. But with SEO tools located there and text within the Elementor editor, it was difficult to get an accurate, real-time idea of how well you were doing.
Now, you can set a focus keyword, or up to five of them, for any page on your site and get feedback as you tweak it. When you type in the focus keyword box, you also get keyword suggestions to help you pick a high-ranking one.
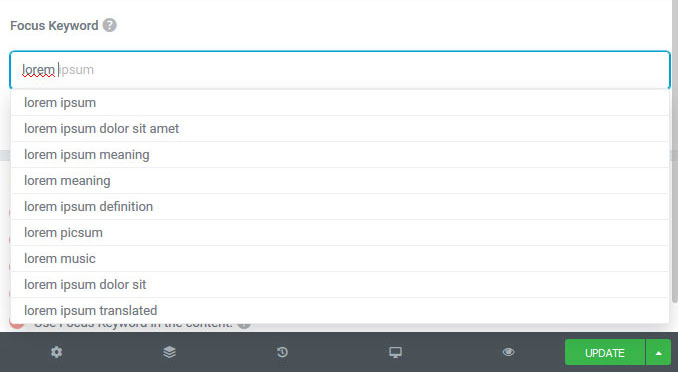
So what exactly is a focus keyword? Every article and page on your site should be targeting a certain keyword. If you use this keyword well throughout your content, you’ll increase your chances to rank higher in Google. Tools like Rank Math allow you to set a focus keyword, then give you suggestions to better integrate it throughout the page.
We have an article on keyword research, too, if you want to know how to choose keyphrases that rank better in the search results.
Below the focus keyword field, there’s a checkbox to mark a page as “Pillar Content.” Pillar content is your most important, evergreen pages, the stuff you want to keep funneling traffic towards forever.
If you mark a post as pillar content, Rank Math will suggest internally linking to that post when you create other pages in the same category. This will keep clicks flowing to your best content for a long time.
Check for SEO Errors
Below the focus keyword box on the General tab, you’ll find one of the most important features in this integration: the smart suggestions. These are what make working with SEO within Elementor a smooth, painless process.
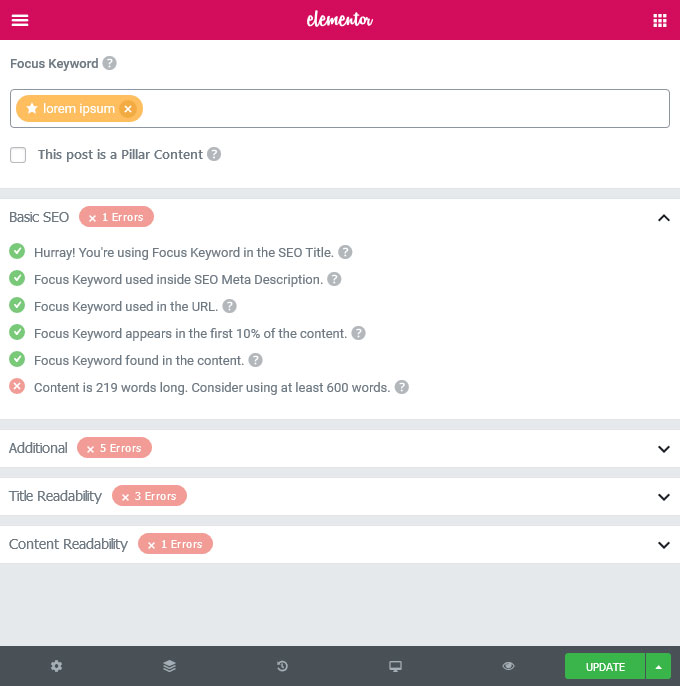
The smart suggestions automatically detect errors within your content, especially concerning focus keyword usage. As you correct these errors, the keywords and the score at the top right of the menu area will light up, turning yellow, then green as you get closer to optimal SEO.
There are four sections: Basic SEO, Additional, Title Readability, and Content Readability.
The first section is, as it says, the basics that you’ll definitely want to focus on. These are all about distributing your focus keyword throughout the page. Make sure everything is lit up green to get the best SEO boost.
Additional targets smaller, but still impactful, areas of improvement such as including your focus keyword in more places, sufficient internal and external linking, and getting your URL to an ideal length.
The final two sections cover those final touch-ups on your title and content. It suggests including strong, emotional power words in your title to attract more attention, and ensuring that your content uses readable paragraphs and breaks it up with images or videos.
If you ever get confused about any of the suggestions, just click the question mark symbol next to each to see a helpful description.
With the smart suggestions tool, you’ll be able to get your content into tip-top shape.
Configure Schema Markup (Rich Snippets)
Have you ever noticed those Google results that stand out a little more? They might have a photo, a star rating, or even an entire recipe attached to them. These are known as rich snippets, schema markup, or structured data. And they’re a great way to get noticed in the search results.

The third icon within the SEO tab leads to Schema, where you can choose what type of page you’re creating and fill in the necessary information. These are your options:
- None
- Article
- Book
- Course
- Event
- Job Posting
- Music
- Person
- Product
- Recipe
- Restaurant
- Service
- Software Application
- Video
Most of these speak for themselves, but each one comes with its own unique settings. For instance, if you choose the Job Posting snippet, you’ll need to enter information like the salary, location, and organization creating the job offering. The recipe snippet requires a list of ingredients, cooking time, cuisine, and many other options.
There’s also a Headline and Description box on each one. You can either use the default title and meta description you created before, or write up a new one that only displays within this rich snippet.
You can only choose a single rich snippet type per page, so choose the one that best applies to your page.
Just keep in mind that Google won’t always display your search result as a rich snippet. It appears dynamically in response to user queries, when they include a certain keyword or phrase. But even the chance of having your page stand out that much is worth the extra work.
Advanced SEO Features
Besides all of these core features, there are a few advanced features you’ll want to know about. They can be found under the Advanced tab. Just a word of caution: don’t modify these unless you know what you’re doing.
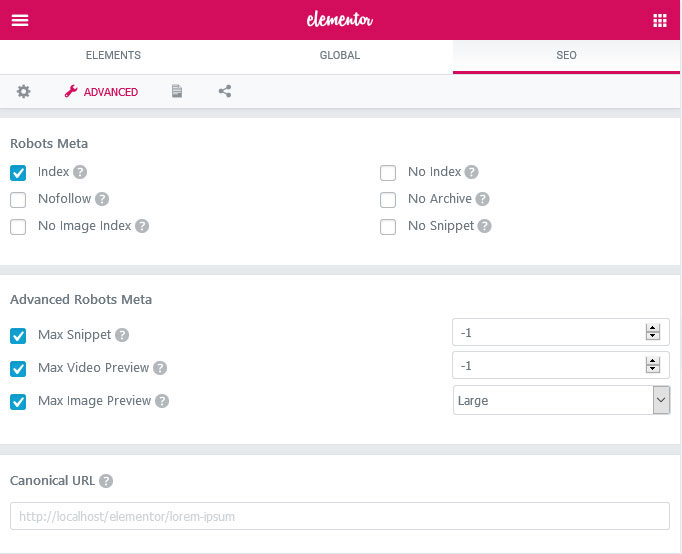
The first set of options lets you edit the robots.txt, or the document that tells search engine crawlers how to index each page. Here are the settings and what they do:
- Index – This page will be indexed and appear in the search results.
- No Index – The opposite is true; the page won’t appear in any search engines. You should usually only no-index pages that aren’t SEO-optimized or that you don’t want people to see.
- No Follow – Google won’t follow any of the links on this page. Linking to external pages builds authority for them, but linking to spam sites can also get you penalized. Enable this on user profiles and similar.
- No Archive – This prevents Google from showing a cached version of your page, which is ideal for those that frequently update, such as ecommerce product pages.
- No Image Index – Images on this page won’t appear on Google.
- No Snippet – When this page appears in search results, it won’t have a text snippet, just a title.
There’s also Max Snippet, Max Video Preview, and Max Image Preview. These are set to -1, which means “no limit”, but you can change how many characters you want your snippet to be or how many seconds you’d like a video preview to play.
Finally, you can add a canonical URL. If you have several similar or duplicate pages (such as an identical page that uses multiple URLs), you can put in the canonical (or main) URL you want to appear in search results. The other pages will be crawled less frequently.
How to Integrate Rank Math and Elementor
Plugin integrations aren’t always the easiest to install, requiring extra configuration or setup to get both playing well together. Here’s the good news: integrating Rank Math and Elementor is insanely simple. Just install both plugins and you’re done; it works entirely automatically! Here’s a step-by-step walkthrough:
- Login to your WordPress admin.
- Go to Plugins > Add New.
- Install Elementor (if you haven’t already!) One option is to type “Elementor” into the search bar and click Install. Or you can either download the free version from the WordPress repository, or purchase the pro version and download it from your account, then click Upload Plugin and upload the zip file.
- Now install Rank Math. Again, type “Rank Math” into the Plugins page search bar to install it from there, or download Rank Math manually from the repository and upload the zip file.
- Go to Plugins > Installed Plugins and click Activate on both new plugins.

And you’re all done! To see the Rank Math integration in action, just go to any post or page and click Edit with Elementor. You should see a new tab in the editing screen called SEO. Click it, and you’re ready to explore the new SEO features for yourself. That’s all there is to it!
You don’t even need the premium version of Elementor to try it. It works perfectly in the free version.
Just a quick note: you’ll need to sign up for both Elementor and Rank Math to use certain features. For instance, you can’t use Elementor’s templates without an account, and keyword suggestions will be disabled on Rank Math until you sign up with them. You can still use the rest of the core features for both plugins, though.
One last note: if you have an existing SEO plugin installed such as Yoast or SEOPress, you can go to Rank Math> Import & Export> Plugin Importers to move your old SEO settings over.
Eliminate SEO Struggles With Rank Math and Elementor
Elementor is great at what it does: designing stunning, feature-rich websites that will wow your visitors. But due to the separate editing interface, working with SEO tools could be difficult and disruptive to your workflow. Thanks to the Rank Math integration, that’s no longer the case. No more switching back and forth between tabs; you can optimize your content right within Elementor.
With the Rank Math integration, you can set a focus keyword, get suggestions live, and even configure your meta description and schema markup without ever having to leave. It’s the best solution anyone could have asked for, and we hope you have a much smoother SEO experience using Elementor from now on.
If you liked this, you should also check out our official plugin integrations as well as third-party integrations like this one that can turn Elementor into an even smoother experience.
What are some other Elementor integrations you’d love to see? We’re always looking for your feedback, so let us know in the comments!
Looking for fresh content?
By entering your email, you agree to receive Elementor emails, including marketing emails,
and agree to our Terms & Conditions and Privacy Policy.
